I’ve been learning Flutter and Dart language recently and they really impressed me. Flutter is greatly inspired by React and many concepts are already familiar: stateful/stateless, render function, component hierarchy, etc. As for Dart language which backs Flutter, it inherits numerous of the best features from other languages while keeping off from the bad things, so if you already know python, JavaScript, C++, you can pick up Dart very quickly.
Okay, let’s go back to the main topic of this article: creating a stopwatch app. There are some posts about how to build a stopwatch (like this), but I would like to share an alternative approach.
The example in this post used Android Studio. If you haven’t done so, please follow the “Get started” part in the Flutter docs to setup Flutter and Android Studio.
The Idea
Flutter provided a Stopwatch class. It can be started or stopped, and the elapsed time can be read from the elapsedMilliseconds property. So technically we can set up a page with a Stopwatch instance, then simply display the stopwatch.elapsedMilliseconds.
However, there is one problem: Stopwatch does not provide any callbacks, so we have no idea when to perform a re-render. Here the Timer class comes to the rescue. It triggers a callback with a given interval. Therefore, we can use a Timer to trigger the re-render, read stopwatch.elapsedMilliseconds and rebuild the page.
Implementation
Create a new Flutter project in Android Studio, then replace the main.dart with the following code.
import 'package:flutter/material.dart';

void main() {
  runApp(MyApp());
}

String formatTime(int milliseconds) {
  var secs = milliseconds ~/ 1000;
  var hours = (secs ~/ 3600).toString().padLeft(2, '0');
  var minutes = ((secs % 3600) ~/ 60).toString().padLeft(2, '0');
  var seconds = (secs % 60).toString().padLeft(2, '0');

  return "$hours:$minutes:$seconds";
}

class MyApp extends StatelessWidget {
  @override
  Widget build(BuildContext context) {
    return MaterialApp(title: 'Stopwatch Example', home: StopwatchPage());
  }
}

class StopwatchPage extends StatefulWidget {
  @override
  _StopwatchPageState createState() => _StopwatchPageState();
}

class _StopwatchPageState extends State<StopwatchPage> {
  Stopwatch _stopwatch;

  @override
  void initState() {
    super.initState();
    _stopwatch = Stopwatch();
  }

  void handleStartStop() {
    if (_stopwatch.isRunning) {
      _stopwatch.stop();
    } else {
      _stopwatch.start();
    }
    setState(() {});    // re-render the page
  }

  @override
  Widget build(BuildContext context) {
    return Scaffold(
      appBar: AppBar(title: Text('Stopwatch Example')),
      body: Center(
        child: Column(
          mainAxisAlignment: MainAxisAlignment.center,
          children: <Widget>[
            Text(formatTime(_stopwatch.elapsedMilliseconds), style: TextStyle(fontSize: 48.0)),
            ElevatedButton(onPressed: handleStartStop, child: Text(_stopwatch.isRunning ? 'Stop' : 'Start')),
          ],
        ),
      ),
    );
  }
}
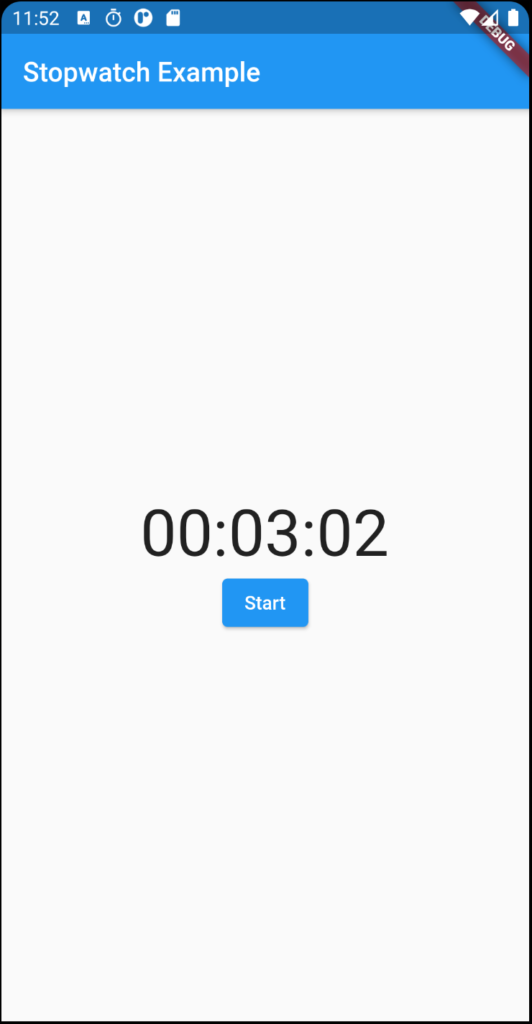
The main class StopwatchPage is a StatefulWidget, who created a Stopwatch instance _stopwatch. The _stopwatch.elapsedMilliseconds is formatted by formatTime function and displayed on the page. A button controls the start/stop of the _stopwatch. Very simple setup.

Run this app and you’ll see the above page. You’ll also notice that the stopwatch does not increase after the “Start” button is clicked. It is actually running, because if you click the “Start” / “Stop” button repeatedly, you’ll see the time increases. That’s the problem we discussed in the “The Idea” section – we don’t know when to re-render the page. The _stopwatch is running in the background, it is simply not displayed.
We will add a Timer instance to help the re-render.
  Timer _timer;

  @override
  void initState() {
    super.initState();
    _stopwatch = Stopwatch();
    // re-render every 30ms
    _timer = new Timer.periodic(new Duration(milliseconds: 30), (timer) {
      setState(() {});
    });
  }

  @override
  void dispose() {
    _timer.cancel();
    super.dispose();
  }
In the above code, we created a Timer instance that will call setState every 30 milliseconds. This will help us re-render the page and reflect the actual stopwatch value.
Now restart the app (hot reloading won’t work since the changes occurred in the initState() ). Click the “Start” button and you will see the stopwatch working correctly.
Conclusion
You can access my GitHub to see the complete code of this post.
In short, a stopwatch consists of two parts: a Stopwatch instance to count the time, and a Timer instance to render the page.
Of course, this app can be further improved, e.g. improve the Timer callback so that re-render is triggered only if the formatted time string is changed. To keep this post short, I’ll leave it to the readers.
But keep in mind that, a Stopwatch instance created in the UI widget WILL NOT survive if the app goes to the background. My tests on Android showed that the stopwatch will stop counting a couple of minutes after the app went inactive.
So the stopwatch can only be used when the app is active. To create a real stopwatch that runs even if the app is inactive, some advanced approaches are required, e.g. a Foreground Service needs to be created on Android.
Webmentions
[…] viagra mg 25 […]
[…] cialis blue pill […]
[…] buy generic cialis online […]
[…] when will there be a generic cialis […]
[…] mexican cialis […]
[…] sildenafil citrate tablets 25 mg […]
[…] sildenafil citrate 50mg tablets […]
[…] how ginseng helps men […]
[…] cheap viagra 25mg […]
[…] cialis daily cost […]
[…] 100 milligram viagra […]
[…] generic cialis from canada […]
[…] purchase clomid online […]
[…] rybelsus online sales […]